Valorant is a very vast and famous game in the youth but it’s a shame that still people have to ask Can you play Valorant on Mac? Mac users have to struggle almost everywhere. When it comes to the game named Valorant Mac users are not sure if they can play Valorant or not, If yes then what is the right procedure?
Today’s post will be specially for those Mac users who are wondering if they can play Valorant on Mac and if the answer is yes which definitely is, then how can you play Valorant on Mac or even how can you install Valorant on Mac? Today’s article is going to be interesting and informative for you all. Let us not do further delay and start our article.
Can You Play Valorant on Mac?
The straight and simple answer to this question is a YES. You can play Valorant on Mac but yes it is very simple as well. You can use Windows virtualization software and then Valorant can be played. There are some ways you can play Valorant on Mac and we will be talking about those ways in this article.
There is only one way to play Valorant on Mac. You can play Valorant by using Boot Camp, Apple’s free desktop virtualization tool. The Apple Boot Camp tool allows you to run both Windows and MacOS on Mac and play Valorant using your Riot Games ID. So, Yes you can play Valorant on Mac.
Can You Play Valorant on Macbook M1, M1X, & M2?
This is not good news but the fact is you cannot run Valorant on M1, M1X, and M2 itself. If you are an M1, M1X, or M2 user then this news would be disheartening for you but the truth is you won’t be able to enjoy the Valorant game on your device as of now.
You can run Valorant on Mac but you cannot run Valorant on M1, M1X, and M2, pretty confusing. That is because these particular devices don’t have the arm architecture chipset and that is the main reason why you cannot play Valorant on these particular devices. Playing Valorant through Boot Camp is not an option. So, as of now, you cannot play Valorant on these devices.
Minimum System Requirements to Play Valorant
You should know the minimum system requirements to play Valorant on your Mac. Just read the requirements and tick all the boxes your Mac covers.
- 4th gen Core i3 or higher
- 64GB of free storage
- Windows 10/11
- Mac With Boot Camp support
Mac Models That Support Boot Camp & Fulfill System Requirement
- Macbook 2015 or later
- Macbook Air/Pro 2012 or later
- Mac Mini 2012 or later
- iMac 2012 or later
- iMac Pro (all models)
- Mac Pro 2013 or later
- iMac Pro 2017
How to Download Valorant On MacOS?
We have already discussed that the only way to play Valorant on Mac is by using Apple’s desktop virtualization tool named Boot Camp. With the help of this, you will be able to run Windows and macOS on the same machine.
There are some needs that you need to fulfill in order to download and run Valorant smoothly.
- The latest macOS installed on the device to support Boot Camp Assistant.
- There should be at least 64GB of free space in your Mac device.
- The startup disk must be as free as Mac’s memory for iMac Pro or Mac Pro with 128GB of RAM or more.
Installing Windows on Mac
Let’s see how to install Windows on Mac using boot camp.
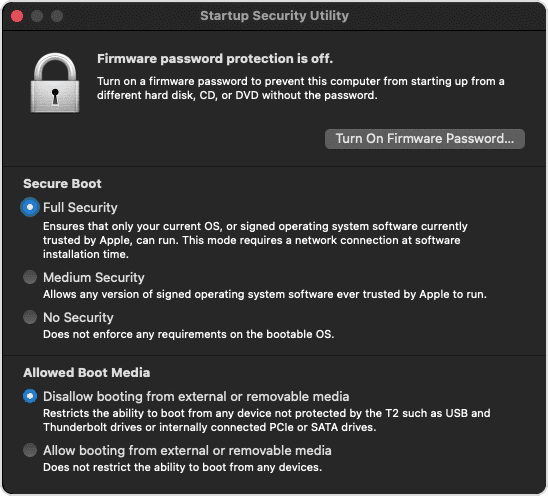
1. Check the Secure Boot Setting
First thing first you need to enable secure boot. It is already enabled to full security by default but by any chance if you ever changed it to no security then first set it to full security before installing Windows.

- Turn on your Mac in recovery mode by immediately pressing the Command – R keys once you see the Apple logo after powering it on.
- Select the user and next, then enter your credentials.
- On the macOS Utilities window enter the macOS password after you select the full security option.
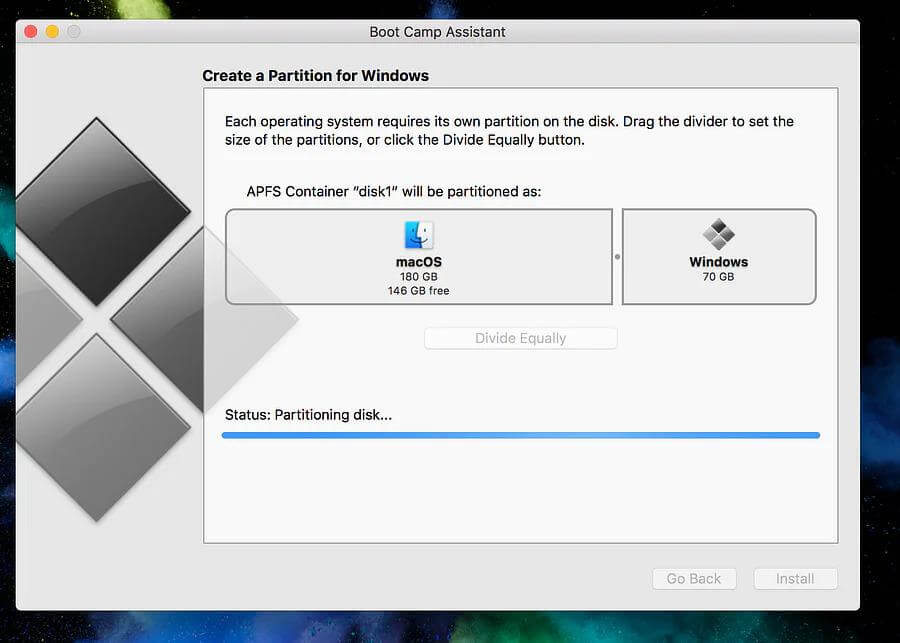
2. Create a Partition Using Boot Camp Assistant:
- Visit the Utilities folder in the Application folder and open Boot Camp Assistant.

- Insert the USB drive into your Mac device when prompted on the screen. This will be used by Boot Camp Assistant to create a bootable USB drive for Windows installation.
- Now, You need to set the partition size for your Windows operating system according to the RAM and storage you have in your Mac as we have discussed before.
- Do it as per your Windows system needs and update as you cannot change this size later.
3. Format the Windows Partition
- It’s time to install Windows in the partition you created for Windows. The Mac device will restart to Windows Installer once it has finished creating the partition.
- Now, You’ll see a prompt asking you the location to install windows, choose the BOOTCAMP partition, and then click the format button.
4. Install Windows
After the format is done the installation process will take place. Click on the “NEXT” button and follow the instructions you see on the screen.
5. Install BOOTCAMP On Windows
Once this process is finished you will see the “Welcome to the Boot Camp installer” window. Follow the instructions you see on the screen and install BOOTCAMP on Windows.
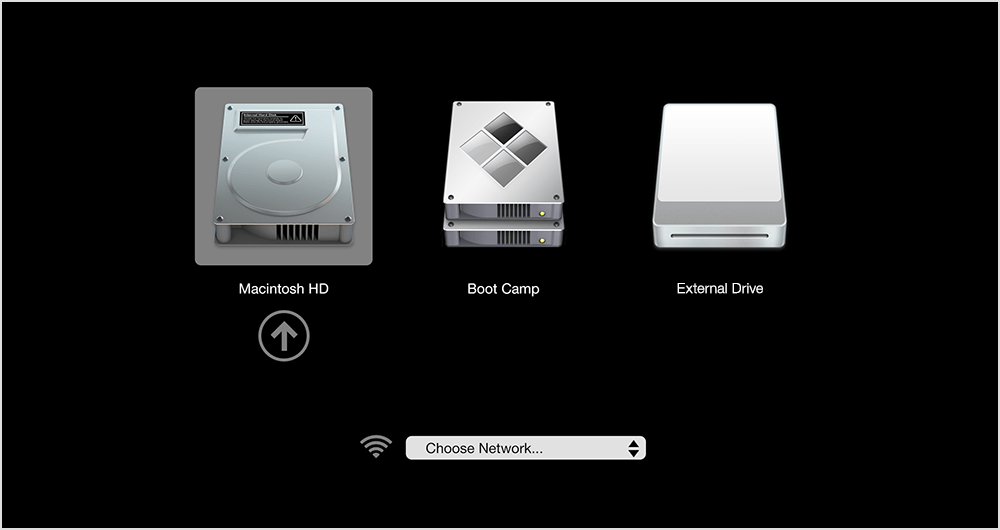
6. Switch From MacOS to Windows
When you install Windows on Mac you can choose whether the Mac startup is in Windows or macOS.
- Restart your Mac press and hold the option key and release when you see the option showing available startup volumes on the screen.

- Choose BOOTCAMP to start your Mac device in Windows.
How to Play Valorant on Mac
After installing Windows on your Mac devices there is not much work left you are halfway there. Now all you have to do is download Valorant and run it on your Mac.
- First, go to www.playvalorant.com and click the play free button you see.
- The Valorant installer package will start downloading, and open the file once it is done.
- Choose the location where you want to install the game. A minimum of 8GB of free space will be required to install Valorant.
- Once it is installed, log in to your Riot Games account by entering your credentials and now you can enjoy Valorant on your Mac.
Frequently Asked Questions (FAQs)
There are many frequently asked questions asked by many people some of them are mentioned below.
Q1. Is there native support for Valorant on Mac?
A1. You cannot run Valorant on Mac without any external tools or workarounds or without any hacks so the answer is no there is no native support for Valorant on Mac.
Q2. Can I play Valorant on Mac without using Windows?
A2. MacOS does not allow you to play Valorant yet. You need to install Windows first if you want to play Valorant on Mac. Unfortunately, You cannot play Valorant on Mac without using Windows.
Q3. What is the best method to play Valorant on Mac?
A3. You can play Valorant by using Boot Camp, Apple’s free desktop virtualization tool. It allows you to run Windows and MacOS on your Mac at the same time and by using Boot Camp you will be able to play Vaorant on Mac.
Q4. Will Riot Games release a Mac version of Valorant in the future?
A4. There is no such information that Riot Games release a Mac version of Valorant in the future but considering the fandom of Valorant there could be the possibility that Riot Games release a Mac version of Valorant in the future.
Q5. Can we play Valorant on the M1 and M2 Macbook?
A5. Unfortunately, you cannot play Valorant on the M1 and M2 Macbook. These devices don’t have the arm architecture chipset which is necessary in order to play this.
Wrapping Up!
As much as Mac users are increasing day by day the question, Can you play Valorant on Mac is still on everyone’s mind. Valorant is no doubt a well-created game with great animations but the excitement comes at a low level when people get to know they cannot play Valorant on Mac.
There is always a way you just have to find one and we found the way with the help of that you can play Valorant on your Mac. The method we discussed in the article is tested and worked perfectly fine that is why we are here with this article to help you people having the same problem. When I first bought a Macbook and found out I could not run Valorant on that that made me sad but then I started looking for loopholes and then found one.
I hope you liked the article and this article helped you. If you have any queries related to this article comment that down we will reach back to you. If you found this article helpful do not forget to share it with your Mac users’ friends. Keep connected for more useful hacks.

